Table of contents
There’s a quiet kind of joy that comes from baking red velvet cream cheese brownies that moment when the aroma of cocoa fills the kitchen and the marbled red-and-white surface sets into glossy perfection. I remember making them for the first time on a rainy afternoon, and by the time they cooled, the whole place smelled like pure comfort. One bite later, even my most dessert-skeptical friend was converted. That’s the magic of these brownies they surprise you in the sweetest way.
What makes them unforgettable isn’t just their striking look (though they’ll steal the spotlight on any dessert table). It’s that flawless blend of rich, fudgy chocolate and tangy cream cheese, a pairing that feels indulgent yet balanced in every bite. Each swirl tells its own little story of texture, color, and flavor harmony.
So preheat that oven and get ready for a little baking alchemy because once you taste these, there’s no going back to ordinary brownies.
Table talk
with Emma!
Every time I bake Red Velvet Cream Cheese Brownies, it’s a total crowd-pleaser rich, creamy, and irresistibly fudgy! Perfect for holidays, family gatherings, or a sweet keto indulgence at home. Even my friends who aren’t doing low-carb can’t stop reaching for another square. A true must-try favorite!
Emma
Why You’ll Love These Red Velvet Cream Cheese Brownies
These cream cheese brownies are everything you want in a dessert and more. First, they’re surprisingly simple to make – you don’t need to be a pastry chef to create something this magical. The red velvet base comes together in minutes, and the cream cheese swirl adds that bakery-quality touch without any fancy techniques.
The texture is absolutely divine imagine the fudgiest brownie you’ve ever had, then add pockets of smooth, tangy cream cheese that melt on your tongue. It’s like getting a brownie and cheesecake in every single bite, and honestly, what more could you want?
Most importantly, these brownies are perfect for sharing. Whether you’re bringing them to a potluck, surprising your family, or treating yourself after a long day, they create those sweet moments of connection that make life a little brighter. Plus, they’re keto-friendly, so everyone can enjoy them without guilt.
What You’ll Need
Let me walk you through the beautiful ingredients that make these red velvet brownies so special. Each one plays its part in creating that perfect harmony of flavors and textures.
- Almond flour – This is our secret weapon for keeping things low-carb while maintaining that tender, cake-like texture. I always keep blanched, superfine almond flour in my pantry because it creates the smoothest batter.
- Eggs – Make sure they’re at room temperature for the best mixing. They’ll give our brownies structure and that rich, custard-like quality.
- Unsalted butter – Melted and golden, this adds richness and helps create those fudgy edges we all crave.
- Unsweetened cocoa powder – The foundation of our chocolate flavor. Don’t skip the sifting step – it prevents those pesky lumps!
- Powdered sweetener – I love how this dissolves seamlessly, creating that perfect sweetness without any grittiness.
- Baking powder – Just a touch to give our brownies a tender lift.
- White vinegar – This little trick helps activate the red color and adds a subtle tang that enhances the overall flavor.
- Red food coloring – This is what gives us that gorgeous crimson hue that makes red velvet so iconic.
- Cream cheese – Make sure it’s softened for the smoothest swirl. This creates those dreamy pockets of tangy sweetness.
- Vanilla extract – A splash of pure vanilla ties everything together with its warm, comforting notes.

Let’s Bake It Together
Ready to create some magic? Here’s how we’ll bring these gorgeous red velvet brownies to life, step by delicious step.
- Preheat your oven to 350°F and grease your 8×8-inch baking dish. I love lining mine with parchment paper – it makes removal so much easier, and you’ll thank me later!
- Whisk together your melted butter and eggs in a large bowl using an electric mixer for 1-2 minutes until gloriously frothy. Add the vinegar and red food coloring, mixing until you have that beautiful, uniform crimson color.
- Combine all your dry ingredients in a separate bowl – almond flour, cocoa powder, sweetener, and baking powder. Sift them together if you can; it creates the silkiest batter.
- Fold the dry ingredients into your wet mixture gradually, stirring continuously. Don’t stress if it takes a moment – you want a smooth, lump-free batter that’s pure velvet.
- Pour this gorgeous brownie batter into your prepared dish and pop it in the fridge while you make the cream cheese layer. This little chill helps create distinct layers.
- Beat your softened cream cheese with sweetener, egg, and vanilla until it’s smooth and dreamy. This should take about 2 minutes with an electric mixer.
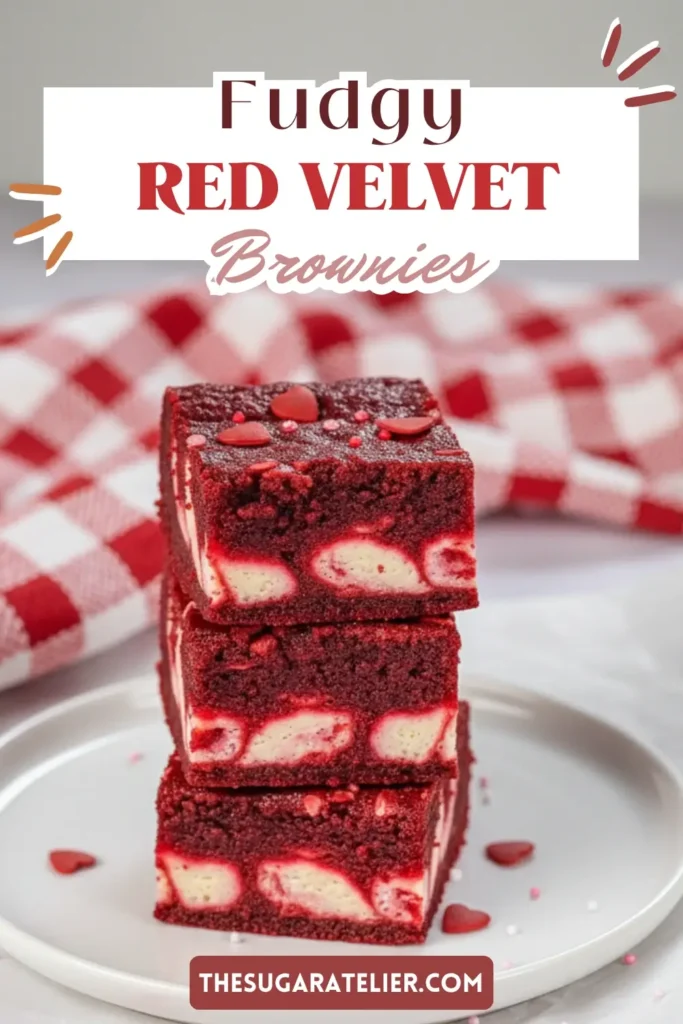
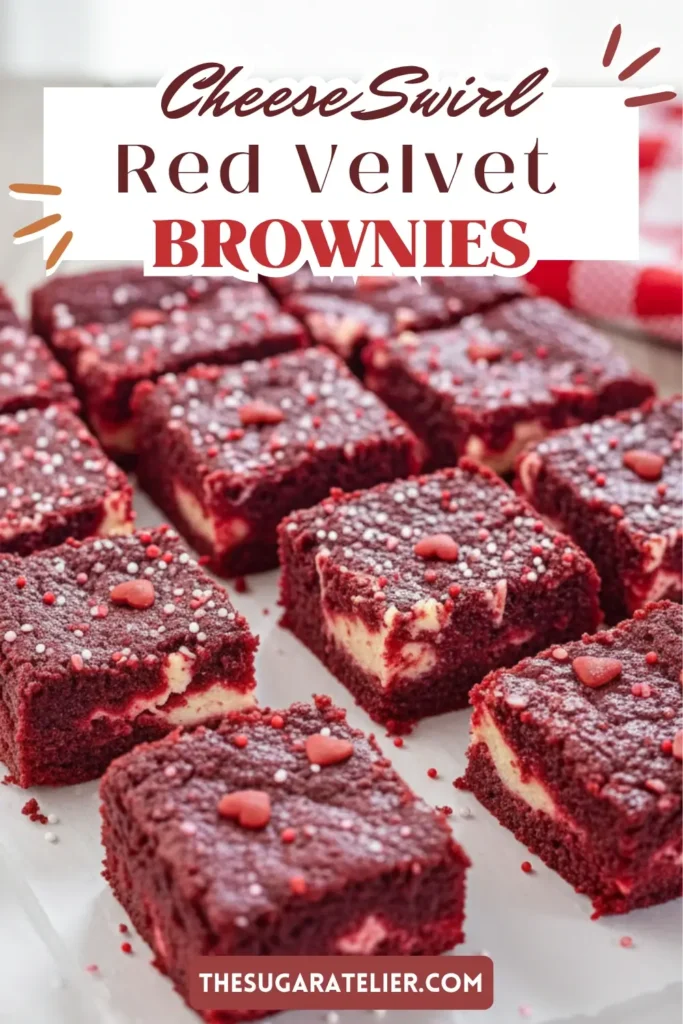
- Dollop the cream cheese mixture over your chilled brownie layer, then use a knife to create those beautiful marbled swirls. Don’t overthink it – imperfect swirls are the most beautiful!
- Bake for 25-30 minutes until the edges look set and the center has just a slight jiggle. You’ll know it’s perfect when a toothpick comes out with just a few moist crumbs.
- Cool completely in the pan before slicing. I know it’s tempting to dive in immediately, but trust me – patience creates the perfect texture!
Serving Suggestions
These red velvet brownies cream cheese swirl brownies are stunning on their own, but here are some of my favorite ways to make them even more special. Dust them with powdered sweetener for an elegant finish, or serve them warm with a scoop of vanilla ice cream for the ultimate indulgence.
For special occasions, I love cutting them into triangles and arranging them on a beautiful platter with fresh berries. The red and white colors are perfect for Valentine’s Day or Christmas celebrations. You can also drizzle them with sugar-free chocolate sauce for extra decadence.
Make It Your Own
The beauty of this red velvet brownies recipe lies in how adaptable it is to your personal taste and dietary needs. Here are some variations I absolutely love:
- Chocolate chip twist – Fold in sugar-free chocolate chips for extra richness
- Lemon cream cheese – Add lemon zest to the cream cheese layer for a bright, citrusy surprise
- Coconut flour version – Substitute coconut flour (use half the amount) for a different texture
- Espresso enhancement – Add a teaspoon of instant coffee to the brownie batter for mocha notes

Kitchen Tips & Tricks
Let me share some wisdom I’ve gathered from years of brownie-making adventures. The most common mistake I see is overmixing the batter – once you add the dry ingredients, mix just until combined. Overmixing creates tough brownies, and we want that tender, fudgy texture.
Temperature matters more than you think! Room temperature ingredients blend together beautifully, while cold ingredients can create lumps. I learned this the hard way when my cream cheese refused to cooperate one chilly morning.
Don’t skip the cooling step – I know it’s torture, but warm brownies will fall apart when you try to cut them. Patience creates perfection, and these beauties are worth the wait.
Storage & Make-Ahead Tips
These red velvet cream cheese brownies keep beautifully in the refrigerator for up to a week when stored in an airtight container. The cream cheese layer means they need to stay chilled, but honestly, I think they taste even better after a day or two when all the flavors have melded together.
For longer storage, wrap individual squares in plastic wrap and freeze for up to three months. They thaw perfectly at room temperature in about 30 minutes, making them perfect for unexpected guests or late-night cravings.
Frequently Asked Questions
Absolutely! They’ll still taste incredible you’ll just have chocolate cream cheese brownies instead of red velvet ones. The flavor won’t change a bit.
This usually happens when the batter is overmixed or overbaked. Keep mixing to a minimum once you add the dry ingredients, and check for doneness at 25 minutes.
Yes! Use a 9×13-inch pan and increase the baking time by 5-10 minutes. The marbled effect will be just as gorgeous in a larger batch.
The edges should look set, and the center should have just a slight jiggle. A toothpick inserted in the brownie part should come out with a few moist crumbs.
Related Recipes You’ll Love
Final Thoughts
These red velvet cream cheese brownies represent everything I love about baking – they’re beautiful, delicious, and bring people together around something sweet and wonderful. Every time I make them, I’m reminded that the best desserts aren’t just about taste; they’re about creating moments of joy and connection.
Don’t be afraid to make this recipe your own. Bake with love, not just precision, and remember that even if they don’t look perfect, they’ll still taste like pure joy. You’ve got this I promise!
Thanks for baking with me today! I’d love to hear how your brownies turn out, so don’t forget to share your sweet success stories.
Remember it later!
Planning to try this recipe soon? Pin it for a quick find later!
If you give Red Velvet Cream Cheese Brownies , I’d love to know how your dessert turned out!
Please take a moment to leave a rating and a quick review—your feedback helps us keep baking up more delightful, foolproof recipes for you to enjoy.
Red Velvet Cream Cheese Brownies
- Prep Time: 10 minutes
- Cook Time: 25 minutes
- Total Time: 35 minutes
- Yield: 16 servings
- Category: Dessert
- Method: Baked
- Cuisine: American
Description
Deliciously rich keto red velvet cheesecake brownies with a marbled swirl of creamy cheesecake and fudgy chocolate layers — perfect for low-carb dessert lovers.
Ingredients
- 1/2 cup almond flour (blanched, superfine)
- 3 large eggs (at room temperature)
- 10 tbsp unsalted butter (melted)
- 1/4 cup unsweetened cocoa powder
- 3/4 cup powdered sweetener (or more to taste)
- 1 tsp baking powder
- 1 tsp white vinegar
- 1 tbsp red food coloring
- 6 oz cream cheese
- ¼ cup powdered sweetener
- 1 large egg at room temperature
- 1 tsp vanilla extract
Instructions
- Start by preheating your oven to 350°F (175°C). Grease an 8×8-inch baking dish or line it with parchment paper for easy removal.
- In a large bowl, add the melted butter and eggs. Mix using an electric mixture for 1-2 minutes until frothy. Add the white vinegar and red food coloring and mix until the mixture is uniformly colored.
- In a separate bowl, mix the almond flour, cocoa powder, powdered sweetener, and baking powder until thoroughly combined. You can sift all the dry ingredients to ensure the batter is smooth and less grainy.
- Gradually mix the dry ingredients into the wet ingredients, stirring continuously to avoid lumps, until a smooth batter forms.
- Pour the brownie batter evenly into the prepared baking dish. Refrigerate while making the cheesecake layer.
- In another large bowl, mix the softened cream cheese, powdered sweetener, egg, and vanilla extract until smooth and creamy.
- Spoon the cheesecake mixture in dollops over the brownie layer. Use a knife or a toothpick to swirl the cheesecake mixture into the brownie batter, creating a marbled effect.
- Place the dish in the preheated oven and bake for 25-30 minutes, until the edges look set and the center is slightly firm.
- Let the red velvet brownies cool completely in the baking dish before slicing them into squares. Serve and enjoy!
Notes
Store in an airtight container in the fridge for up to 5 days or freeze for longer shelf life.
Nutrition
- Serving Size: 1 brownie
- Calories: 140 kcal
- Sugar: 1g
- Sodium: 51mg
- Fat: 14g
- Saturated Fat: 8g
- Unsaturated Fat: 6g
- Trans Fat: 0g
- Carbohydrates: 2g
- Fiber: 1g
- Protein: 3g
- Cholesterol: 40mg